NoviceRunnerNik's Top Tips On Starting Running

99800046_s_friends_running_in_the_park_500x500.jpg

NoviceRunnerNik's Top Tips On Starting Running

Has the London Marathon inspired you to take up running or return to running? Our NoviceRunnerNik, who took up running a few years ago, gives us her top tips on getting started:

  1. Start with a Couch 2 5K app or program such as the NHS Couch 2 5k – this introduces you slowly to running over 9 weeks and gradually builds up your fitness and stamina. Much more sensible than my approach of just going for a 3 mile hilly run just like that and hating the feeling of my lungs exploding out of my chest! I very nearly didn’t run again after trying that!

  2. Run more slowly – particularly if it feels like your lungs are exploding out of your chest. If you can hold a conversation with someone (you might need to imagine that someone if you’re running alone) whilst you’re running, then that’s a great pace to run at. If you can’t, then slow down. You’ll enjoy it more - promise!

  3. Buy decent, comfortable running shoes - have your running shoes fitted by a specialist running shop. Tell them your budget and what you want to do. They needn’t cost the earth. You’ll be less likely to pick up an injury wearing shoes that fit you and are fit for the job.

  4. Don’t increase your longest distance or number of miles in a week too quickly, however much you’re enjoying it, or you risk overuse injury. An often quoted rule of thumb is to increase both by no more than 10% per week. Use a free phone app such as Strava to record your runs so that you know how far you’ve been.

  5. Run your own run – don’t worry about what speed or distance someone else is doing. Run to how you feel, rather than a pace you think you should run at on your GPS watch.

  6. Run with other people – join a running club or run walk group or find a friend to run with. Running with others takes your mind off the running and motivates you to turn up and run. Running clubs will have varying routes with leaders so that you don’t even have to think about where to run. In my experience running club members are really friendly and approachable. They aren’t all elite athletes racing for TeamGB (some of my running club members do run for TeamGB but you wouldn’t know it!). And you always have running to talk about.

  7. Buy some proper running clothes - you’ll be more comfortable and you’ll feel the part more and be more motivated to run. You don’t need to spend a fortune. Always wear a decent, supportive sports bra or chest support if you need it. They're vital bits of kit, especially if a few extra grams are being carried in that part of the anatomy.

  8. Vary the routes and surfaces you run on – to keep you interested and to get your body moving in different ways - try footpaths, coast paths, grass, mud etc but be careful.

  9. Get parkrunning! If you haven’t heard of parkruns they are free, timed weekly 5k runs, happening all over the country, every Saturday at 9am. You can walk, jog or run them so they are perfect for new runners and they are great for measuring your progress, if you wish. They only happen because people volunteer to organise and marshal at them so give something back now and again and volunteer too.

  10. Running can be really addictive! Don’t blame me if your running habit starts to escalate out of your control!

Words by NoviceRunnerNik.

Getting ready for JLL Property triathlon (or other triathlons at Dorney Lake)

With triathlon season warming up and the JLL Property Triathlon on the horizon at the end of June, we asked our soft tissue therapist and Triathlon Coach Emily to give us her best tips for preparing for your triathlon. She’s even given her top tips for racing at Dorney Lake:

Getting ready for JLL Property triathlon

(or other triathlons at Dorney Lake)

Emily-triathlong-Lake-Dorney_500x500.jpg

Dorney Lake is an ideal venue for a sprint distance triathlon - pancake flat course and calm lake water to swim in. It’s beginner-friendly and a good place for seasoned triathletes to gauge their fitness. After competing in more than a dozen races there, I’ve come up with some useful Dorney-specific tips to make your race day as smooth as the lake.

Getting there

From London, you can take your bike on to the train to Windsor & Eton Riverside or Windsor & Eton Central. From there, it’s a 3.5 mile ride to Dorney Lake, perfect for warm up. Be sure to ride down Bovney road which will get you to the start line side rather than the car park side at the far end of the lake. Take a look at this map.

If you are driving, make sure you get there at least 1.5 hours before your wave starts, so you have time to park and get down to the other end of the lake to register and check in.

Swim: Sighting

Normally, I would suggest to my athlete to sight every 6 strokes or so, and trust no one in a race. At Dorney Lake, the small buoys are actually attached to each other under the water like a lane rope. So depending on where your starting pontoon is, sight for the first buoy, from there, keep your head down and follow the ropes underneath to complete the swim lap.

For those of you who are doing the 2.2 km swim, the trick to holding a straight line is a symmetrical stroke. Bilateral breathing, enter your hands into the water at 10 o’clock and 2 o’clock position with good full body rotation.

Bike: Counting laps

This is by far the trickiest part of the whole race… counting to 4 is surprisingly difficult when in race conditions… you can use 4 bits of sticky tape on the handle bar where you would take one off per lap, just be sure to remember whether you did it at the start of the lap or at the end of the lap (can you see now how confusing it could get?)

A bike computer is useful, just remember to start it, and that GPS can be slightly out. Unlike other sprint tri’s the bike course is 21.2 km.

Transition

For a sprint distance triathlon, every seconds count in transition. Think how hard it would be to take 1 min off your 5km run time or your 750 m swim time In transition, all it takes is to be calm and a little bit clever:

  • Lay out your transition with the shoe holes facing you; sunglasses open and inside helmet; helmet straps open with its inside facing up so you can flip it on to your head; race belt under your shoes ready to be stepped into.

Transition layout.

  • Practice dismounting your bike on the fly:


Kirsty demonstrating a flying dismount.

 
  • If you’re a strong swimmer, ditch the wetsuit and use a swim skins tri suit instead. (At that time of the year, it is likely for a race there to be wetsuit optional).

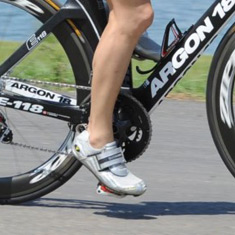
  • Instead of bike shoes and clip-in (aka clipless) pedals, you can use courier straps on flat pedals and trainers. That way, you can roll straight off the bike and on to the run, for a 20km flat ride, bike shoes and clipping in make negligible difference (I’ve tried both multiple times).

triathlon_road-cleats_230x230.jpg
triathlon_MTB-cleats_230x230.jpg
triathlon_straps-shoes_230x230.jpg

Whether you use road cleats, MTB cleats or just trainers with straps, such a flat course at short distance, it makes no difference.

  • Instead of wearing socks, put plenty of talc powder in your shoes and go sock-less.

Wind

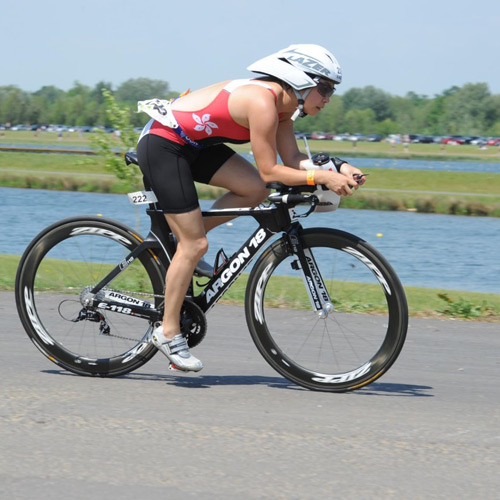
Dorney Lake is always windy, for some reason you’ll get a constant side or head wind wherever you are in the bike lap. This is the place for Time Trial bikes if you have one, if you don’t, practice riding on the drops and stay low. Make sure whatever you’re wearing is tight fitting and nothing is flapping about.


Pack list

  • Trisuit (wetsuit if you’re wearing one, lube for your neck)

  • Goggles (you may want tinted ones if it’s sunny)

  • Running shoes

  • Talc powder

  • Race belt for putting your race number on

  • Bike in good working order

  • Helmet

  • Sunglasses

  • Bike shoes if you’re using them.


Good luck, have fun!


Words by Emily Chong. Image by Scott Collier Photography.

Marathon preparation: taking care of your knees

taped marathon knee injury

Marathon preparation: taking care of your knees

It's hurtling towards us at a huge rate of knots, like Brexit, Christmas and Whitsun all rolled into one, but none of these require the same volume of physical, mental and emotional preparation as the London Marathon* (except perhaps Christmas....). As your mileage racks up, certain areas can get tighter, having a knock-on effect elsewhere - in particular the outside of the knee.

If you notice that your running style has started to involve a little more of either your foot turning outwards whilst your knee is facing forwards or your knees turning inwards whist your foot is facing front, this can often end up to soreness in the outside of the knee, increased tension in the iliotibial band (ITB) and/or tightness in the outside of the hip. As the miles increase and this pattern is repeated, it can become very sore. However, there are a few things you can do to check the cause of this.

Where does it come from?

The reason the knee will be turning inwards, or the foot relatively turning out will be related to one of 3 areas:

  • Tight calf muscles

  • Weakness/inhibition of the hip rotators

  • Overactive lateral hamstrings

Knee valgus - this isn’t A Good Thing.

Knee valgus - this isn’t A Good Thing.

Tight calf muscles:

If the alignment issue corrects by doing a decline small knee bend (see images below), it is likely the calf muscle (particularly the gastrocnemius, fact fans) is likely to be part of the main drive of the problem.

Decline small knee bend

Decline small knee bend

If you think you aren't stretching your calves out sufficiently, then start. As soon as possible. If not sooner.

As we fatigue when we run, certain muscle groups will become less effective leaving us with few options to propel us forwards. It often comes down to the calf to drive this and if they aren't getting a sufficient stretch, then the change in mechanics can become problematic. Stretching the calf with a straight knee (fully straight) and holding for up to 20 seconds at a time will help. Not only after a run, but check and stretch regularly through the next few days too.


Weak hip rotators:

If the decline small squat doesn't correct things, it is likely to be a problem with the rotators in the hip, including gluteus medius and some of the deeper rotators. Some light conditioning work can help resolve this problem


Overactive lateral hamstrings:

Difficult to spot on yourself, but if after toe off, your foot tends to turn outwards as the knee comes forward, the outer hamstrings might be dominating the movement. Exercises to balance out knee flexion by using the more medial hamstrings can help, as can identifying which of the other two problems need addressing and working on all of them


Anything else?

Lateral quads stretches can be really useful for this. Think of doing a normal quads stretch (i.e. heel to backside) but stretch using the opposite hand to the affected leg and pull it across to the opposite buttock and push your hip forward. This should favour the outside of the quads around the tight area


Do I really need to stretch?

Stretching is a bit of a faff and it means extra time added onto your run, however it is one of the key practices at this stage to return you ready to run again when you need to train. Just do it!


* other marathons, indeed, other long distance races do exist.


Don’t ignore your niggles or pains this late in your marathon training. Call us for an appointment on 02030 12 12 22.


Words by Paul Martin. Images courtesy of www.medi.de and runningreform.com.

Emily's top tips for marathon (training) recovery

Vertical-rush-Emily-Chong-finish-photo.jpg

Emily's top tips for marathon (training) recovery

Manchester, London and other marathons are coming up soon and we hope your training is going well. Recovery is as important as getting those miles in, so make sure you're well prepared for your marathon or marathon training recovery.

Our soft tissue therapist and Triathlon coach (and partaker of extreme challenges), Emily Chong, writes: A few days ago I ran up a skyscraper 10 times for charity. Specifically, I climbed 420 floors in 1hr 29min taking the fastest female title and 4th overall. Naturally, I was bracing myself for DOMS (delayed onset muscle soreness) from hell. 24 hours later, my legs felt good, 48 hours later, nothing hurts!

Vertical-rush-Emily-Chong-stairs-photo.jpg

After years of experimenting with recovery routine, I’ve finally found the combination that works for me. After leaving the tower, I stood at a high table and stretched my glutes, quads and hamstrings while waiting for my anchovy, spinach and mushroom pizza, washed down with a litre or so of water and a glass of orange juice. I stood in the Tube on the way home using the over head bars to stretch my lats. Once I got home I had a cool rinse followed by a warm shower and a 45min nap. That evening, I went to swim club: the main set was suitably a mixture of technique and a small amount of 70%-90% short sprints.

Maybe that doesn’t sound like most people’s recovery (other competitors seemed to have spent the next 4 hours sitting in the pub!) but if you prefer your legs to be intact the day following your marathon, here is my magical (aka sensible) recovery regime. With running and triathlon seasons starting you may find it useful.

  1. Don’t sit down, or you’re just shortening already shortening muscles. Straight after a race (or training), keep walking, eat while you’re standing and while you’re standing, do some gentle static stretches.

  2. Cool dip - where it’s available, such as the Brighton marathon or a lake side triathlon, walk thigh high into the water, walk around or stay there for 2 - 5 minutes. The cool water temporarily constricts the blood vessels. As you come out of the water, they’ll dilate and encourage blood flow, carrying oxygen and other recovery material to your muscles.

  3. Rehydrate - Most people are under-hydrated in a race. As you heat up, electrolytes (various salts) come out with your sweat. It is very important to replenish both and not just the water. You can buy water soluble electrolyte tablets, or ones that come in a capsule form. For a natural alternative, bananas and pomegranates are full of electrolytes.

  4. Refuel - catch that 30 minute post-race window of opportunity to get some easily digestible carbs and protein into your system to kick start recovery. Many national teams swear by chocolate milk but for a dairy free alternative, try nut butter toasts or an avocado honey smoothie.

  5. Active recovery - getting blood circulated through your muscles is key to recovery. While a brisk walk and an easy swim is fine, what works better is some short, low impact maximal effort such as 5-10 repeats of 10 seconds max efforts kick in the water. Alternatively, spin with medium to low effort on a bike for 30 minutes or so, interspersed with 3-5 repeats of 10 seconds high power and high cadence.

  6. Sports massage - again this encourages blood flow with the bonus of some assisted stretching thrown in - definitely good for recovery. A post-event massage is meant to be gentle, so don’t expect or ask for a deep tissue massage as it could cause damage to already tired muscles.


If you’d like to book an appointment for a post London Marathon or post any other marathon or event recovery massage with Emily, call us on 02030 12 12 22. Have a great race!


Amazing views!

Amazing views!

Words by Emily Chong. Images courtesy of Emily and Shelter.

The Long(est) Read: Ultra Running Tips

Colin Bathe Arc of Attrition ultra runner

The Long(est) Read: Ultra Running Tips

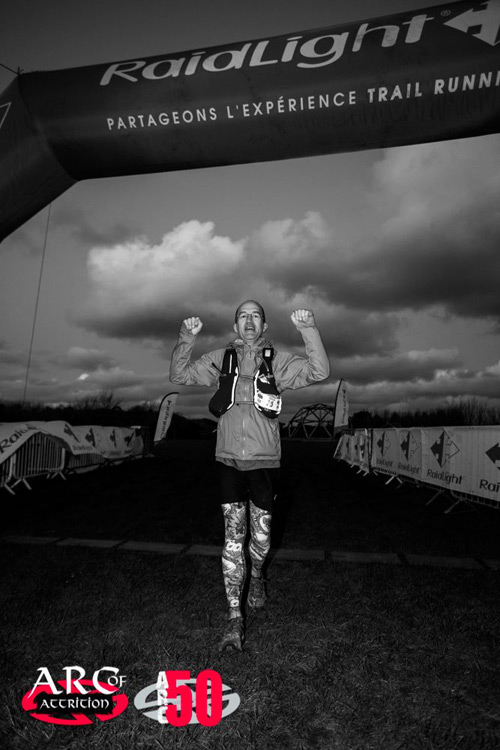
NoviceRunnerNik’s husband Colin ran The 2019 Arc of Attrition, a brutal 100 mile race around the Cornish Coast Path in the depths of a chilly February weekend, finishing in a Gold buckle winning time of 29 hours and 40 minutes. Billed as The South West’s Toughest Winter Footrace, The Arc has a DNF rate of around 54%, reflecting just how hard this event is.

This was Colin’s first 100 mile event and he’s shared his top ultra running tips and experience of the race with you:


1. Preparation

Preparation is key. Know what you’re taking on. Read as much as you can about the race – many people blog about races so there’s a wealth of information out there. Join the race Facebook group if there is one. Learn from other people’s experiences. Put together a training plan and try and stick to it but don’t overdo the miles and risk injury. If you are local to the event, reccie the course in sections so that you know exactly what the terrain, elevation and actual route is to reduce the risk of losing your way in the event.

Colin ran around 30 miles per week and did four long runs of around 25 miles and tapered to almost nothing in the last couple of weeks before the race. He’s fortunate enough to live local to the event and reccied the whole course, sometimes with fellow entrants and on occasion with previous entrants (picking their brains).


2. Mental Game

Getting your head in the right place on an ultra is more important than running ability. You’ll often hear that ultra running is 90% (or similarly large %) mental strength. Keeping nutrition, hydration and physical comfort in a good place for the duration of the race all help to keep your mental state there too. Being prepared will give you confidence and help your mental ability.

Colin nailed the nutrition and hydration and apart from a bit of a low, with the threat of tears, at Mile 78 when he realised he couldn’t see out of one eye (more on this later), he was in a great place all through the race.


3. Nutrition and Hydration

Ultras are actually a series of All You Can Eat contests with a bit of running in between. You have to eat and drink well all the time to keep your body properly fuelled and hydrated and this will keep your mood buoyant too. Everyone knows this but it is something that can be very difficult as your body can just straight refuse to take anything down. Eating real food, rather than gels, seems to work for many people as evidenced by the very well provisioned check points on the Arc.

Practice eating real food on your training runs to work out what goes down well whilst running and what doesn’t and try lots of things. Also practice running straight after large meals so that you can have the confidence to eat well at check points and then continue running.

Keep drinking all the time and don’t wait until you feel thirsty – it’s too late then. Make sure your fluids are easily accessible – use a bladder and hose hydration system or a hydration vest with soft bottles held at the front. You should be peeing regularly all the way around your event so practice this on your training too.

Colin ate cocktail sausages, pork pies, baby tomatoes, radishes, grapes (stolen from crew supplies!), Snickers, Bounty, mini cheddars, soup, rolls, pizza, peanuts and very high calorie flapjack with just one gel right at the end to get him up the final hill.


4. Clothing

Your choice of clothing will obviously be dependent on the expected weather conditions but again train wearing the gear you expect to wear on race day. Chafing can be a painful problem during ultra runs so run-specific underwear is worth considering.

Colin wore waterproof shorts on top of long running tights and with a waterproof running jacket, taking care not to put too many layers on his top half to avoid overheating and sweating too much. The jacket and shorts kept his core dry which meant he didn’t suffer from the dreaded chafe.


5. Feet

Looking after your feet is also really important. Make sure your shoes have plenty of life left in them whilst you train. Test methods of foot care whilst you’re training to work out what works for you to avoid the near trenchfoot condition and blisters that 36 hours of running in wet socks and shoes will afflict on you. Regular sock (and shoe) changes and feet cleans will help. If you have to run any long sections of different terrain, e.g. road / pavement when you’re running a coast path event, then consider changing shoes at the start and finish of these sections, if you can.

At most sock changes, Colin cleaned his feet (or had it done for him!) of the worst of the mud using wet wipes, dried them off and then applied a new thick layer of Vaseline. It kept his feet dry and also helped with avoiding blisters. He changed socks six times and went from trail shoes to road to trail and then a second pair of trail shoes through the event. His feet were almost perfect at the end of 100 miles. Others looked as if the soles of their feet had been turned into relief maps of the whole course!


6. Crew

If race rules allow, having crew who drive round the event with you and pop up every so often for sock and shoe changes, refilling water bottles, handing out food and cheering you on makes your run easier. It means you can carry less weight in your pack and change clothes easily too. Treat them well as it’s a long and often dull job! Make sure you’re clear about your expectations and requirements from your crew. Plan where you expect to see them and communicate well. If your crew is a runner they will really understand what you’re going through.

Colin’s crew consisted of his wife Nik (a runner) and good friend Lee (an ultra runner), who they had crewed for in the Arc 2017 and 2018. There’s another blog post about how to crew for your ultra runner coming up!


7. Navigation

If the course is self-navigated, take time to work out what and practice with technology that will help you on your route finding as getting lost not only takes up valuable time, it can be really demoralising just when you need to keep your spirits up.

Colin used a Garmin Forerunner 235 watch to give him a rough map to follow so that he could check the route ahead and see if he was grossly off course or not. He also had a detailed map on his phone using the Locus Maps app and a downloaded offline copy of OpenStreetMap. He used a portable power pack to charge his phone and Garmin at check point stops.


8. Kit

Pack weight can make a difference to pace so pack carefully. If you have crew, carry the mandatory kit and leave as many of the ‘nice to haves’ with your crew, particularly if you’re seeing them very regularly.

Colin carried the mandatory safety kit (of course) but very little else. Without water and food, the carry weight was 2.1kg, around half of what some other people were carrying and he’s certain this made a difference.


9. Ultra Runner Issues

Corneal Oedema

A few miles before the St Ives Checkpoint at Mile 78, Colin noticed he had lost the vision in his right eye – all he could see was a white fog. Whilst concerned about the deterioration of his eyesight, his biggest concern was that he would have to retire when the race was going so well for him! The medics at the check point told him that Corneal Oedema, swelling of the cornea causing it to go cloudy and restrict vision, isn’t unusual in ultra runners. It is thought to be caused by dehydration, cold, wind and etc.

It had also affected around 10 other runners during the Arc. Colin was blind in the right eye for the last third of the race but it started to recover at the finish and he was 100% back to normal the next day. Some were less lucky with at least one person suffering vision loss in both eyes and having to retire from the race. More details on Corneal Oedema and Ultra Marathons are available here.


Vomiting

During the 2018 Arc of Attrition, with temperatures hovering around the freezing mark and a strong wind, many runners were struggling with constant vomiting and were unable to keep food and sometimes even water down. Being unable to refuel and rehydrate can have dire consequences for someone who still has 60 miles to run. Lee, Colin’s crew, suffered this but somehow managed to finish! It’s likely it was a symptom of mild hypothermia so getting Lee warmed up was the first thing we did. Another tip given by one of the checkpoint staff was to get him to drink lukewarm water instead of the chilled water in his pack. This is less of a shock to the stomach and certainly reduced the chances of seeing the water again - it worked a treat!


10. Stats

And because every ultra runner I know loves stats, here are Colin’s from the Arc:

  • 101 miles

  • 12,300 feet of ascent

  • 160 starters

  • 67 finishers

  • 29 hours 40 minutes 45 seconds

  • 218,000 steps

  • 11,000 calories burnt

  • 1.6kg weight loss

  • 2 very small blisters

  • 1 gold buckle

  • 1 very big smile (make that three)!


Colin-Bathe-Arc-of-Attrition-Ultra-Runner_finisher_500x750.jpg

Words by Colin Bathe and Nik Bathe. Images courtesy of MudCrew Events Ltd.

9 weeks to the London Marathon - our top tips and injuries to avoid

Always choose your running kit with care!

Always choose your running kit with care!

9 weeks to the London Marathon - our top tips and injuries to avoid

Congratulations! You are now only 9 weeks from the London Marathon (other marathons are available).

Here are a few tips on how to keep going and avoiding breaking down:

  • Follow a training plan that not only says run. Two short runs and a long run on a weekend. Add in strength and conditioning, plyometrics, cross training and yoga/pilates. This can help with injury prevention and potentially faster times.

  • Your training will hurt. The marathon will hurt. The massages will hurt, everything will hurt. You need to stay motivated and have discipline. You will have good and bad days during your training. You have to be motivated to get out and run, but to keep this up takes discipline. Remember why you are running this race.

  • Be realistic with your finish time especially if it’s your first marathon! Race management is essential. Don’t go off to hard and fast! You can't just double your half marathon time adding 10-15 minutes and expect to run the marathon in that time. Aim to finish your first marathon.

  • Race nutrition: find what works for you! Sweets and Lucozade for energy can help, but be aware of overdoing it with these, try dried fruits, nuts and electrolyte drinks.

  • To stretch or not to stretch! The evidence is conflicting so do what works best for you.

  • Tapering is essential in those last 2-3 weeks. Don’t try and squeeze in one more long run.


Here are the 7 most common injuries and how to manage them:

  1. Runner's Knee: Patellofemoral pain syndrome (PFPS), is the irritation of the cartilage on the underside of the patella (kneecap). This can flare up during or after long runs. Be aware of foot over-pronation (excessive inward foot rolling) and weakness of the quadriceps, hips, or gluteals. Introduce rest days and reduce mileage. Uphill running can be less painful. Work on strengthening of gluteals, quadriceps and hamstrings. Avoid downhill running. Introduce low impact exercise like cycling, cross trainer or swimming. Try shortening your stride.

  2. Iliotibial Band Syndrome (ITBS): the ITB lies along the outside of the thigh from the hip to the knee. ITB irritation occurs if you take up your mileage too quickly. It’s a stubborn nagging injury. Be aware of foot biomechanics. Hip and gluteal weakness maybe a factor. Rest days and ease off mileage can help. Use a Cross trainer. Mix up the direction of your runs. Try shortening your stride.

  3. Achilles Tendonitis/Calf injuries: Achilles tendon connects the two major calf muscles to the back of the heel. Increasing your mileage too quickly, hill sessions and sprints can aggravate the Achilles. Be aware of tightness of your calf muscles. Stop if you have pain during or after running. You cannot run through this injury. Early diagnosis is essential. Days off will significantly increase your chances of getting back to running. Eccentric stretching and calf strengthen gastrocnemius and soleus muscles are advised.

  4. Hamstring Issues: Muscles that run down the back of our thighs. Be aware of muscle imbalance of quadriceps (thigh) over powering the hamstrings. Sudden strong pain and bruising, significant injury, extended rest required. Less intense, chronic overuse injury, you can usually run. Running a slow, easy pace is usually less difficult than attempting intervals or hills. Cycling, pool running, and swimming helps. Strengthen and stretching your hamstrings will help avoid injuries.

  5. Plantar Fasciitis: Small tears or inflammation of the tendons and ligaments that run from your heel to your toes. Pain is a dull ache or bruise along your arch or on the bottom of your heel, is usually worse first thing in the morning. Be aware of foot biomechanics, high or flattened arches. Avoid increasing mileage too quickly. Tight hip flexors, weakness and tight claves, weak core muscles, and a history of lower back pain can also contribute. This is a nagging injury, running is possible but can delay healing. Pool running and swimming to the keep pressure off your feet. Calf stretches and strengthening. Good fitting shoes are essential.

  6. Shin Splints: Achy pain that results when small tears occur in the muscles around your shin bone. Prevalent in new or returning runners doing too much, too quickly, wearing the wrong shoe or a pair with too many miles, and high arches or flat feet. When pain strikes, ease off your running to a comfortable level for a few days to a week, then slowly up your mileage using the 10 percent rule (no more than 10 percent increase per week). Bike, pool run, and swim.

  7. Stress Fracture: Stress fractures develop due to cumulative strain on the bone. Runners most often have stress fractures in their shins, feet, hips or heels. They are one of the most serious of all running injuries and are a result of over training. More common in women than men. You cannot run through this injury. Expect 8-16 weeks off from running depending on the severity of your injury.


If you suspect you have any one of the above injuries do not hesitate to make an appointment with us by calling us on 02030 12 12 22. Correct management of your injury is essential.

Deferred Entry

If you do have to withdraw from the 2019 London Marathon, you are guaranteed a place in the 2020 race – unless you had already carried your ballot entry over from 2018 or are running for a charity. You have until 20:00 on Saturday 27 April 2019 to complete the withdrawal form on the Virgin Money London Marathon Deferrals page.

Words by Nick Smith.

Tips for a happy, healthy and (hopefully) injury-free skiing trip

25109380_s-escue-ski-patrol-help-injured-woman-skier-lying-in-snow_500x500.jpg
 

Physiotherapist and Director of Physio Remedies, Paul Martin writes: If you fail to prepare you are preparing to fail. This and hundreds of other nags from childhood frustratingly seem to prove themselves as we get older. This is just as true with a ski trip as anything else, so here are a few things to consider.

1. Prepare well

Try to arrive in good physical condition. Being stronger and well coordinated helps you be more robust as you hit the slopes, but aerobic fitness is important with regards to acclimatisation. The earlier you can start working on this, the better, however it’s never too late to start to make changes (starting three days beforehand might be pushing the bounds of physiological adaptation a little bit).

Ideally aerobic fitness levels should be worked on two tot three months prior to your holiday, whether it is running, swimming or biking. Increase your effort gradually over this time and then two weeks before keep training at a maintenance level appropriate for you.

2. Take a relaxing walk on arrival

Carrying bags, skis, kit and other peripherals adds extra load to travel, which is in itself an energy sapping experience. When you arrive at your hotel/chalet and have checked in, go for a walk to loosen off so you are not hitting the slopes tight and tired.

3. Stay hydrated

Dehydration can have effects on many body systems from the annoying (bad breath and dry skin) to something more important for physical activity (muscle cramps and slow response times).

On the plane/bus/car journey ensure you drink water or diluted juice drinks and during your trip be conscious of how much alcohol, drinks high in sugar and caffeine you are consuming, especially if you are unable to get water on board.

Quick checks are colour of urine (should be more straw yellow colour than milkless builder’s tea) or pinch a small area of skin – it should return to shape within two seconds if hydrated enough.

4. Get extra sleep

Get extra sleep on the first few days, better to go to bed early than having a lay in.

5. Pop your goggles on early

Start wearing your goggles half an hour before you are due to start your first run, as it allows your eyes to adapt to the change in colour which in turn will improve your reaction time on the run. Good reactions minimise risk of injury.

6. Allow time to find your 'ski-legs'

If it’s been a while since you last skied, allow yourself time to acclimatise and get your 'ski-legs'. Keep it simple, stick to easier runs initially and don’t push too hard too soon. After the first couple of runs and when you feel you have got your rhythm – enjoy!

7. Eat sensibly

Be sensible with your diet – keep it balanced with a slightly higher volume of carbohydrate as these break down most easily into useable energy.

8. Warm up and warm down every day

Make sure you warm up and warm down as what may seem no problem on day two, might well be a problem on day five. Tight and tired muscles can impede reaction time and enjoyment of skiing.

9. Do you really need to fit in that 'last run of the day'?

In the vast majority of post-injury physio sessions, when asked what happened to cause the problem the opening line is very often ‘It was the last run of the day and I thought I could just squeeze another one in’. If you are tired (but might not be feeling it), if things are getting icier (especially if your reactions are slowing down), if you have half a mind on what you are doing that evening rather than the slopes, is it worth the risk of a nasty injury?

10. A word about knee injuries

Although skiing injuries usually affect multiple areas of the body, the knee is the most commonly injured body part, with evidence indicating 42% in some studies. Further to this, the ACL (Anterior Cruciate Ligament) is the highest injury observed within the knee occurring in all ages, genders and technical levels.

Our knee specialist physio, Stuart Mailer, has written a blog post dedicated to avoiding knee-related skiing injuries.

Take home:

  • Prepare well if you‘ve not been as active as you would have liked in the previous few months.

  • Be mindful of what you eat for fuel and drink to remain hydrated

  • Don’t take silly risks, especially early on in your holiday and at the end of the day

Stay safe and have a fabulous holiday!

If you do have an accident or pick up an injury whilst on your winter hols, call us on 02030 12 12 22 to book an appointment. We work with the top surgeons in the UK and can help put you back together again.

Words by Paul Martin.

Injury of the month: Office Christmas Party Inuries

33938665_s_office-christmas-party_500x500.jpg

Injury of the month: office Christmas party injuries

The office Christmas party season is in full swing and much as we always love to see you, we prefer it even more if you remain uninjured. So we have some helpful tips to help you avoid injury at this treacherous time of the year:


1. Don't Drink and ice skate

To avoid painful falls, ice burns and sliced fingers, stay off the Mulled Wine until you've cleared off the ice.

And go easy on the triple toe loops. No one likes a show off.


2. Take care with the office decorations

RoSPA says that around 1,000 people a year are injured by their Christmas decorations. Nasty things those baubles!

Be sensible: use step ladders, rather than that spinning office chair, or get someone else to put the decorations up and take the risk.


3. Pull those crackers carefully

Christmas crackers can contain not only ridiculous hats and stupid jokes, but also explosive charges and missiles.

Don't pull crackers close to someone's ear, however much you dislike them and certainly don't pull a cracker with so much vigour that the plastic toy/magnifying glass/miniature pack of cards flies out at such a speed as could cause blindness should they strike someone in the eye.


4. Don't Drink and Drive

There's no need to risk it when you have a world class public transport system on your doorstep and a pair of feet to get you home after the office do.

In fact, book that taxi before you go out.

Stay Safe and enjoy the Christmas Party Season!

Words by NoviceRunnerNik aka Nicola Bathe.

Avoiding skiing-related knee injuries


93528876_s-the-fall-of-the-skier-in-the-snow_500x500.jpg

Avoiding skiing-related knee injuries

Many of us will be getting ready to go on our skiing trips within the next few weeks or months and enjoyable as this will be, unfortunately can cause injuries. Skiing does not affect only one anatomical area and injuries can occur to the head, shoulder, wrist, thumb and of course the knee. The knee is the most commonly injured body part in skiing with the evidence indicating 42% in some studies. Further to this, the ACL (Anterior Cruciate Ligament) is the highest injury observed within the knee occurring in all ages, genders and technical levels.


Injuring the ACL

The ACL is one of the knees biggest stabilisers and injury normally occurs from a fall, either forward and with a twist or falling backward. Normally the knee will rotate internally causing knee valgus (knee caves inwards towards your mid line). It is not uncommon to injure the meniscus and the medial collateral ligament (MCL) at the same time as the ACL - this is known as the unhappy triad. Interestingly it has been seen that a lack of fitness is one of the most contributing factors indicating that physical preparation can assist in injury prevention measures.


Exercise Intervention

When we land on one leg the hip muscles help to prevent the knee joints rolling inward (knee valgus) while the quadriceps help reduce forces on the knee joint helping deccelerate the body. The hamstring and calf muscles also work to help reduce knee joint forces, stabilising the pelvis and knee and ankle.

Undergoing a basic injury prevention exercise plan can significantly help in not just reducing injury but also improving your skiing consistency as you can improve, muscular strength, endurance, anaerobic fitness, stability, agility and flexibility.


Muscular strength

Recreational skiing is associated with the high muscular use of the quadriceps, hamstrings, gluteal and calf muscles. Evidence has shown that prolonged skiing causes increased eccentric fatigue of the quadriceps and hamstrings that may contribute to injury. To help reduce this lower body exercise such as squats, lunges and single leg squats are all beneficial in improving your lower limb strength and stability.


Neuromuscular/Proprioceptive training

Undergoing some sports specific training, particularly neuromuscular or proprioceptive training, can be beneficial in helping to reduce technical mistakes while skiing. These are training methods that can involve jumping, landing or pivoting or balance work that can help stabilise your knee and leg. These can be undertaken by using a variety of equipment such as the Bosu, inflatable discs, foam pads, wobble boards and jump mats. Improved joint awareness and ability to stabilise can help in skiing performance and injury prevention.


Mobility/Flexibility

A reduction in flexibility of muscle groups and poor joint mobility can cause increase loading on joints and other tissues due to limitations in our movements. For example, tight calf muscles will reduce the ability to squat without lifting the heels. This may cause knee valgus that can then put higher forces into the knee joint. Maintaining good flexibility of the lower limb muscles can help you move more efficiently and improve muscular activation and proprioception.


How physiotherapists can help

We can perform a musculoskeletal screening to help to find your imbalances, biomechanical dysfunctions and then implement a plan to help address these aiding to your injury prevention and performance.


To book an appointment with Stuart or our other physios call us on 02030 12 12 22.


Words by Stuart Mailer.


Injury of the month: ACL Injuries

The Anterior Cruciate Ligament (ACL) is one of two main internal stabilisers of the knee. Along with the Posterior Cruciate Ligament (PCL), the cruciate ligaments work in concert to reduce shear (to the front and into rotation) of the tibia on the femur. This is only one of many functions of the ACL and is one of the main reasons why the ACL becomes damaged.

The anatomy of the knee

The anatomy of the knee

As you can see from the above diagram, the ACL has close links to the medial meniscus (cartilage), which is in turn attached to the medial collateral ligament. Remember this, it will become important later….

Main Functions of the ACL

The main function of the ACL is to reduce anterior translation and rotation of the tibia on the femur. It also has an important role in the brain’s understanding of where the knee is in space.

How Does It Go Wrong?

There are a number of ways ACL injuries occur:

  • intrinsic - i.e. occur due to movement or loading of the individual knee in a way that overloads the ACL to the point of damage or

  • extrinsic - i.e. trauma caused by a blow causing overload of the ACL to the point of damage.

Classically, the ACL becomes damaged during deceleration movements with the lower leg is turned outwards relative to the knee, which is why physios keep banging on about hip, knee and foot being in alignment as this reduces this type of shear. This can come from sudden changes in direction, poor landing from a height or pivoting with a fixed foot.

Extrinsic (traumatic) can be caused by force striking (usually) the outside of the knee. In the most severe cases, due to the close links between the structures, an ACL tear can also involve the medial meniscus and medial collateral ligament - also known as the ‘Unhappy Triad’ injury.

What can I do to reduce the risk of ACL injuries?

Much of this needs to be taken care of through management of well aligned movement patterns. If the resting position of the lower limbs tends towards either knees facing forwards with feet turned out or feet facing forward with kneed facing inwardly, stress on the ACL is increased. There are two main contributors to this, either poor hip and trunk control and/or tightness in the calf (especially gastrocnemius) muscle. There seems to be some unpublished data suggesting a predeterminant of ACL injury can be recent poorly/incompletely rehabilitated ankle injuries which then place more load upon the knee.

Read our blog post on how to avoid skiing-related ACL injuries.

What happens if it goes wrong?

An ACL injury is generally accompanied (but not always) by significant swelling. A feeling of the knee giving way (especially on going down slopes or hills) is also a good indicator, however there is usually a significant loss of range of movement and pain that are more obvious indicators.

What should I do?

That depends upon the severity of the injury and what you would like your lifestyle to include. A surgical opinion is highly recommended, however there is quite a trend currently to eschew surgery and rehabilitation in favour of non-operative management.

In my experience this tends to prolong the inevitable surgery and rehab if you are interested in an active lifestyle with multidirectional sports/activities. Rehabilitation can be a long, frustrating process (between 9 and 12 months) however whilst it won’t ever return the knee to the ‘perfect’ pre-operative state, it will give you a strong, functional knee that will allow you to continue the vast majority of activities with minimal restriction.

If you’re having knee trouble, call us on 02030 12 12 22 to make an appointment with one of our knee specialists.

Words by Paul Martin.


Are you sitting comfortably on your bike?

bikefit_merckx_final_500x500.jpg

Are you sitting on your bike comfortably?

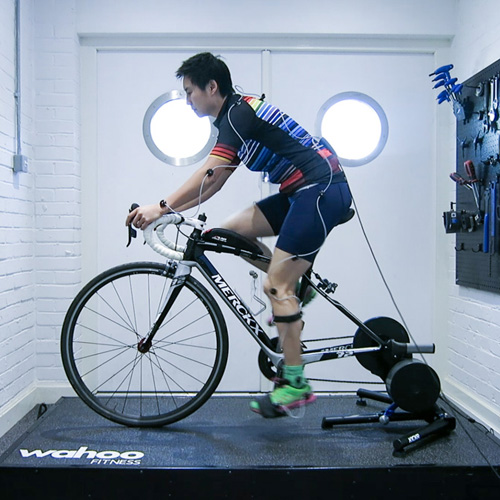
If you are not sitting comfortably on your bike, at best, you will not be able perform to your best ability, at worst, you can cause damage to yourself. So here are some useful tips from our Soft tissue therapist and Triathlon coach, Emily Chong, to get you settled on your saddle.

Buying a bike

Regardless of colours or brand, if a bike doesn’t fit, it’s no use to you. Each brand and each bike model has a different geometry, so a bike of the same size but different brand can fit completely differently. Bike size in general is denoted by seat tube length. While this is indicative of the bike size, if the top tube is too long, then you won’t be able to reach the handle bar. A seat post can go up and down by 20-40cm, handle bar reach can only be adjusted by switching to a shorter or a longer stem or adjusting its angle, and this can only be increased or decreased by a few cm. So if shop just asks how tall you are and hands you a bike, politely decline and escape immediately. Everyone has a different leg to torso length ratio, you could have a short torso / long legs or vice versa, narrower shoulders or smaller hands. You should always get measured first before buying a bike new or second hand. If the bike shop doesn’t measure at least all of these - torso length, arm length, inside leg length, shoulder width, hip flexion, don’t bother buying from them.

You can also DIY by downloading a bikefit app such as Size My Bike where you can input all the above measurements and generate a recommended geometry, you can then find a bike (by comparing its geometry) that most matches it and get a bikefitter to fine tune the fit.

There are places where they can measure you and build a bike to your specifics from prestigious makes such as Condor to the budget conscious Planet X. A bike that fits will 100% be faster than one that doesn’t, regardless of how high its spec it is.

Worst and best riding positions.

Worst and best riding positions.

Saddle sores

These are broadly two kinds of causes to this “pain in the butt” - friction and pressure. Most likely, pain is caused by both. Here is how to deal with it.

Pressure

If the pain feels like there’s too much pressure in a small area such as seat bones to the rear, or the soft tissue in the middle or in the general undercarriage area, then we need to first look at how hard you are pushing your pedals vs how much weight is on the saddle. To relieve the pressure, you’ll need to either increase the upward force by pedalling harder, go up a gear or reduce the downward force by lessening the weight on the saddle. If you are carrying a backpack for commuting, you could use a rack and panniers instead and you can also look at spreading your body weight between the handle bar and the saddle by leaning forward a little more.

Friction

If you are getting saddle sores that look like pimples, these are caused by follicle irritation or inflammation. Wearing bike specific shorts with pads (called chamois) will help as it covers the seams and provides a smoother surface. Bike shorts are supposed to be worn without any underwear (thus eliminating seams that would cause chafing) and with chamois cream (cream like lubricant) along the crease of your legs / bikini line and along the contact points between your bottom and the saddle. Any waxing and shaving will definitely increase the chance of follicles irritation, so it’s best to just trim hair to no shorter than 3cm should you feel the need to. For women, if the friction is felt in the middle soft tissue, try switching to a saddle with a centre cutout (see below), bike shorts that are not too heavily padded in the middle and apply “bedroom lubricant” to the inner tissue (regular chamois cream is not meant for internal use).


Saddle with a centre cut out

Saddle with a centre cut out

You could also try saddles with a split nose design which are becoming increasingly popular. These saddles are meant to be perched on with your seat bone therefore there is no body contact anything further in front. To be in this position, more weight will need to be through the upper body - which means these saddles are more suitable for Time Trial or tri bikes or racing bikes with handle bars much lower than the saddle.

Asymmetrical saddle sore

If you can see a pattern that only one side is affected, assuming your bike setup is symmetrical, then we’ll need a closer look to your range of movement and biomechanics. Issues such as limited back rotation, restricted knee bend and commonly tight hip flexors from prolonged sitting at your desk can contribute to your bike discomfort. It would be best to get checked out by a physio and focus on strength and conditioning.

Adaptive measures on the bike

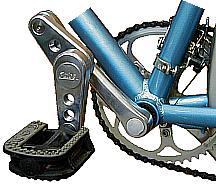
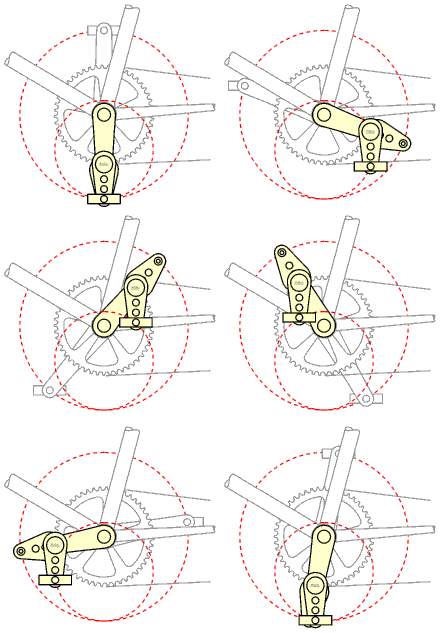
If you have a condition that creates a permanent biomechanics impediment, for example a knee surgery that has limited how much you can bend one knee, then there are companies who can make adaptive changes to your bike from shortening your crank, to adding a swing crank to your pedal, all the way to a custom recumbent bike.

Not sitting comfortably?

If you’re not sitting comfortably on your bike, you can book a session with Emily, who is also a L3 bike mechanic, by calling us on 02030 12 12 22.

Happy riding!

Words by Emily Chong.

Injury Of The Month: Football Injuries

93963376_sclose-up-of-an-injured-male-soccer-player-on-field-use-500x500.jpg

Injury Of The Month: Football Injuries

The football season is now well and truly under way both at professional and also amateur level so we've asked our physiotherapist Alex Manos, who specialises in the lower limb and hip & groin and used to be the First Team Physio for Crystal Palace FC, to give us the guided tour of common football injuries and how to avoid them:

Football Injuries

Having worked in professional football for most of my career, the injuries I see there are no different to the injuries seen at the local football pitch on a Sunday morning. So here is some information on common injures seen and advice on how to ensure the best possible recovery and reduce the risk of re injury.


Preparation

Even at amateur or weekend warrior level, it is still important to prepare as well as possible. A good level of prior conditioning, both strength and cardiovascular fitness wise, will reduce the risk of injury. Working on lower limb strength and stability and also increasing running endurance by using running drills or alternative forms of cardiovascular fitness such as the bike or circuit training will improve both performance and reduce the risk of injury.


Fitness for football


Football is a mixture of aerobic and anaerobic fitness as it can involve both short and long bursts of activity. If you are thinking of improving your fitness levels for football, training should replicate this. For example, you could do interval running session sessions on the treadmill or outside running.

For longer type runs, box to box runs are good where you run from the front edge 18 yd box to 18yd box and then very lightly jog to the goal line, turn and start the run again on the edge of the box. These would be at about 70-80%, 3-4 sets of 6-8 runs with a rest of 2-3 minutes in between sets is good.

For shorter drills then cone work which incorporates shuttle type runs or change of direction drills can be done. As the speed and intensity is higher, ensure a longer rest between runs and sets so you can work at maximum speed.

Circuits or what is commonly known as HIT (high intensity training) is a great way to work the entire body from a strength point of view and also gain cardiovascular benefits to give you a better engine during matches.

Focusing on lower limb stability exercises such lunges and squats will also help with fitness, power, speed and reducing injury risk.. A lot of force goes through the legs so having strong, balanced legs with good ability to safely change direction will help prevent injuries.


Common injuries

Muscular injuries are common as people often reach maximal sprint pace for prolonged distances and as there is kicking involved, it is an additional risk factor. Joint sprains in particular to the ankle and knee are also prevalent. Here are three common injuries:

 
  1. Hamstring tears – the hamstring is made up of three muscles at the back of the thigh. Hamstring injuries are very common in football. They typically occur when players are sprinting and when the hamstring is changing its function from shortening to lengthening. Players will report feeling a tearing or maybe even a popping sensation in the back of the thigh. This will lead to pain, reduced mobility and in moderate and severe cases there may be bruising and swelling.

    These injuries need rehabilitation and won't just get better with rest. The muscle needs to be adequately strengthened for a safe return to sport. Mild strains can take as little as two weeks whereas severe tears could take up to three months if not more. Once you have had a hamstring tear the risk of re-injury is higher so it’s crucial to do the appropriate work to reduce the risk. A physio can help direct your rehab and ensure all the boxes are ticked. This would be a combination of flexibility and strength work and also then implementing some specific running drills.

  2. Groin pain – groin pain is a very complex area but is very common in football. The complexity arises from the fact that there are many possible sources of groin pain in athletes and footballers. The hip joint, the pelvis, the lumbar spine, the muscles around the hip and groin and also the abdominal area can all be a source of injury and symptoms. Quite often there is also more than one pathology, or if not then the original injury can lead to other imbalances which then give rise to a secondary problem.

    One of the most common misdiagnoses is one of repeated ‘groin strains’ as muscular injuries. Quite often these strains are not actually muscular and the pain originates from the hip joint. An accurate diagnosis is key to providing the right type of treatment to this area and with a thorough subjective history and detailed physical examination, a physiotherapist will be able to determine the problem areas. There may be times where physiotherapy alone is not enough and further intervention such as an injection or surgery may be required but the first thing to do is be properly assessed and referred on for further investigations or opinions if needed. Some groin injuries can become chronic and very difficult to get back from so the sooner they are dealt with the better.

  3. Knee sprains – the knee is vulnerable to injury in football due to the nature of repetitive twisting and turning and contact. Two of the injuries which are seen are Anterior Cruciate Ligament and Medial Collateral Ligament injuries (ACL and MCL respectively). Both injuries can be a result of contact or non contact mechanism but will involve the knee being twisted beyond its normal range which causes ligament damage. ACL injuires usually require surgery whereas MCL injuries (unless very severe) are more often rehabilitated without surgery.

    The recovery following ACL reconstruction is a minimum of six months but typically will be 9-12 months. Minor MCL injuries can recover in six weeks and more severe tears can take three to six months. These injuries require lots of rehabilitation to build the strength back around the knee and other joints. The ligaments provide stability to the knee so any disruption to this weakens the knee and it’s crucial to regain maximum strength and stability before returning to sport. A physiotherapist will guide you through the appropriate stages in rehab to try and return to your previous level of activity.

If you have picked up an injury related to football or want some advice on any of the above or anything else please feel free to call us on 02030 121222 to book in with one of our physiotherapists.

Words by Alex Manos.

Injury of the month: Tennis Injuries and how to avoid them

44529307_s_tennis_player_500x500.jpg
 

Injury of the month: Tennis Injuries and how to avoid them

Has Wimbledon fortnight inspired you to pick up a racquet? Read our Physio Alex's advice on equipment, fitness and avoiding the most common tennis injuries:


Equipment 

It's vitally important that the racket you use is set up correctly for you. This means ensuring the grip size is appropriate, the weight and style of the racket suits your level and style of play and perhaps, most importantly, the string settings are correct.

Even small adjustments can make a big difference to your game and prevent injuries, mainly to the wrist and elbow and also help overcome existing injuries. It's well worth going to a specialised tennis shop for advice on this. 


Fitness for tennis

Tennis is mainly an aerobic sport in that it is made up of short bursts of energy with rest but repeated often. If you are thinking of improving your fitness levels for tennis, training should replicate this. For example, you could do interval sessions on the bike (as opposed to pedalling continuously for 20 minutes or so). Mixing shorter intense bursts (15 secs up to even 1 minute) with rest would be more beneficial. You could also do the same on treadmills or outside running - short sprint type interval training rather than long moderately paced runs.

Circuits or what is commonly known as HIT (High Intensity Training) is a great way to work the entire body from a strength pint of view and also gaining cardiovascular benefits to give you a better engine during long matches!

Focusing on lower limb stability exercises, with lunges being one of the best exercises is really important in being strong on court and allow for sharp, multidirectional changes of direction. A lot of force goes through the legs so having strong, balanced legs with good ability to safely change direction will help prevent injuries. 


Common injuries 

Unlike sports like football or rugby which are played on bigger pitches, tennis is contained to smaller areas so muscular injuries are less common as people don't often reach maximal sprint pace for prolonged distances. So, tennis places more load on the joints and tendons than other sports due to the quick short change of direction and also the fact that it's mainly played on hard surfaces. Here are four common tennis injuries. 

Lower back pain - it's quite common for tennis players to suffer with painful lower backs. Serving in particular places high loads on the lower back and can compress the joints. The combined forces of quick extension and then rapid rotation and flexion can stress the joints. To try and prevent this it helps to have good mobility in your hips and lumbar spine together with a strong core. Focusing on core exercises which incorporate rotation, almost mimicking certain phases of the serve can really help reduce the risk of injury.

Shoulder injures - rotator cuff strains/pain. The rotator cuff is a group of muscles which surround the shoulder joint to provide stability and strength to the shoulder. It's by nature not a very stable joint as it is so mobile so when it is placed through high loads during ground strokes and more so in serving, it can lead to strains and/or inflammation of these structures. Working on the control and stability of these muscles by doing overall shoulder strength training but in particular lots of lighter rotational work will help prevent injuries. 

Tennis elbow - or as its known clinically as Lateral Epicondylalgia is not exclusive to tennis but is prevalent, especially amongst amateur or club players. As stated above, equipment is key and so is technique on shots. The forearm muscles which moves the wrist and elbow are small and not particularly strong. They are prone to being overstretched whilst under stress (particularly on backhand). Having good technique and also good strength in the wrist and shoulder can reduce the load on these delicate muscles. 

Patellar tendon/achilles tendon pain - as mentioned above, due to the start / stop nature of the sport, these joints and associated tendons take quite a beating! As with trying to prevent most tendon injuries around the body, keeping strong and conditioned in the bigger muscle groups will protect the joints and tendons. If you think of the joints as the area which will take the most force during movements, and the muscle system as the braking mechanism for this, the stronger and more efficient those brakes are to slow down the forces, the less load will be placed on those tendons and joints.

If you have tendon pain already during tennis its important to seek professional advice. Patients often come to us with several months' history of tendon pain as it can be painful but often can be 'played through', and it's true, often with the correct advice and exercises you can continue to play but it needs to be properly assessed first. 


If you think you may have an injury related to tennis or want some advice on any of the above or anything else please feel fee to contact us or book in with one of our physiotherapists. Enjoy the tennis season and the strawberries and cream (but not too much cream!...)


Words by Alex Manos.

Open Water Swimming Tips

open-water-swimming-male-athlete-swimming-in-lake-triathlon-long-distance-swimming-500x500.jpg


Open Water Swimming Tips

Now the triathlon and Open Water Season is in full swing, if you’re feeling slightly anxious, here are a few tips from our soft tissue therapist and Triathlon coach, Emily Chong, to help your training and competing:


Practice, practice, practice!

  • Find some open water to train in before your event and get used to lower visibility and the natural environment.

  • Practice in your wetsuit. Wear your goggles under the swim cap, or better yet wear two caps and have the goggles sandwiched in between (less chance of them getting knocked off).


Starting in a race

  • If it is a deep water start, get yourself horizontal, gently kick your legs and scull with your arms out stretched. When the horn goes, you’re in the right position to take a few strong kicks and pull forward.

  • If you prefer not to be in the crowd, go to the side and swim wide of the turning buoys.


Swimming in a wetsuit

  • When swimming in a wetsuit, relax your elbows so you’re not fighting the neoprene, straight arm recovery is absolutely suitable for open water.

  • Focus on engaging your gluteus muscles (clench your bottom!) keeping your legs together and make sure your core is long and engaged. Imagine doing a plank and you should feel your legs rubbing at thigh, calves and toes just touching.

  • Use body rotation to lengthen your stroke, entering your hands in 10 o’clock and 2’ o’clock position. This helps engage your back muscles to swim. Imagine doing a pull up - it’s almost impossible with our hands together, but with your hands slightly wider than shoulders, you will have much more power to pull yourself up.

  • When you get into the water, splash your face and the back of your neck. Put your face in and slowly exhale. If you have a tendency to panic, take some time to do this until you feel your heart rate has calmed down.


sighting-open-water-swimming 640x210.jpg

Sighting

  • While waiting to start, look at the course and find something in the landscape that lines up with the buoy markers to sight for. Something like a hill or a tall colourful building so it would only take one glimpse to see (buoys may seem big, but once you are horizontal amongst splashing swimmers, they can be hard to spot).

  • Think crocodile eyes, try not to lift your head too much or your legs will sink, making swimming harder. Find a pattern to suit your breathing / sighting.


Plan B

  • If you feel your chest is too tight / your goggles get knocked off / you are cramping, roll on to your back, take some deep breaths, readjust yourself, once you feel ready, roll back to your front and carry on. If necessary, hold one arm in the air, the safety kayak will come to your rescue.


Finishing

  • As you approach the pontoon, speed up your kick a little to activate your legs and to get blood flowing. Take it easy going from swimming position to standing up position, you may feel a little dizzy due to blood going from the top half of your body down to your legs.

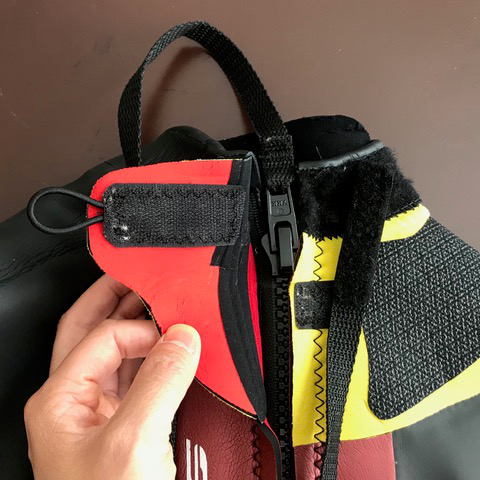
  • Undo neck velcro on your wetsuit and pull the cord to open the zip. Grab the neck opening and pull your arm out of the wetsuit. If your wetsuit gets stuck at your wrist, loop it around your knee and use it to pull it out. If you already have your cap and goggles in your hands, great! they can stay inside the wetsuit sleeve till after the race.

  • Pull down wetsuit from the waist, side step and stand on your wetsuit several times to get your feet out.

Done! now go and enjoy your ride and run (or post race celebration). 


How to put on a wetsuit

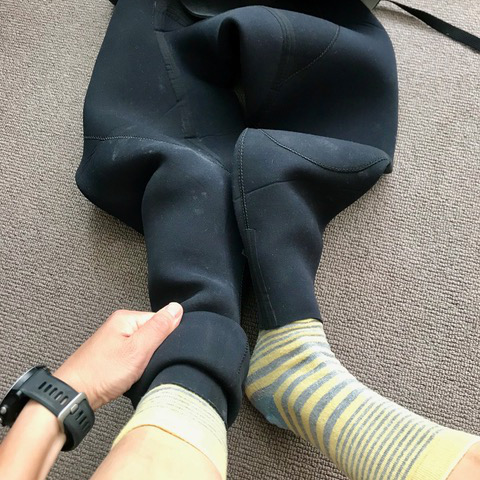
  1. Use a glide stick or other thick lubrication (Rock Rub is my favourite) and generously rub it over your forearms, calves, quads and hamstrings and around your neck.

  2. Put some cotton gloves on to avoid nicking your wetsuit with fingernails. If possible always grab the inside material to pull rather than the smooth outer side of the neoprene)

  3. Turn the bottom half of your wetsuit inside out.

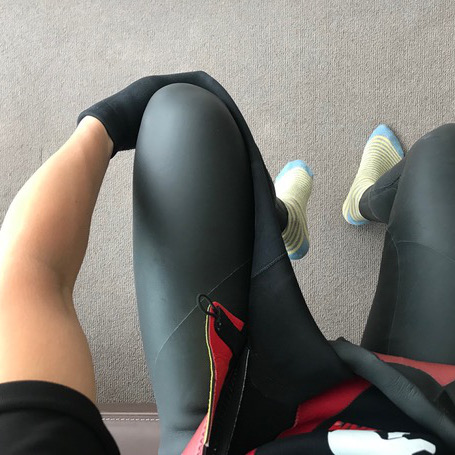
  4. Keep your socks on (or put each foot into a plastic bag), and put your feet into the leg holes and roll up the legs. (Remember the zip should be at the back!)

  5. Pull the wetsuit up to your waist.

  6. Ideally, find someone who can grab the wetsuit from behind and pull it up as though they were going to give you a “wedgy”. Otherwise, do that yourself, keep pulling up until the crotch area is more than snug.

  7. Put one arm in, pull it up to your shoulder, then put the other arm in.

  8. Ideally, get someone to “shoehorn” you in from behind. They should put their hands on the back of your shoulder / upper arm and pull the wetsuit back to create more space in the chest.

  9. If there is nobody to help you, bend the elbow, grab the crease and ease more material towards your shoulder until the zip is fairly close together at the back.

  10. Once both arms are shoehorned in, the back zip should be quite close together without having to pinch your shoulder blades together (if not, you will probably struggle to breathe). Now you can zip it up.

  11. If it feels like it’s restricting your neck, bend forward, grab the crease and ease more material towards your chest.

  12. Make sure the zip is in “up” position, loop the cord over the neck velcro and stick the end of the cord in it, so you know where to find it when you need to take it off. (Remember to take your socks off!)


Call us on 02030 12 12 22 to book an appointment if you have any injuries or niggles or if you'd like a pre- or post-race sports massage.

Words and images by Emily Chong.


It's National Walking Month - let's get walking!

walking_boots_500x500.jpg

It's National Walking Month - let's get walking!

May is National Walking Month!

Walking is one of the best exercises you can do - it's low impact, requires little kit, almost anyone can do it and you can do it almost anywhere.

Walking can burn around 80-100 calories per mile and it's a great way to stay active and improve your fitness. Exercise and being in the great outdoors are good for your mental health too.

Fitting in walking:

If you don’t move much, now’s a good time to start moving more and walking is the perfect entry level exercise. So let's get walking:

  • Walk during your lunch hour: spend 20+ minutes of your lunch hour away from your desk – get outside for a walk in the fresh air, explore the environment around your place of work.
  • Take the stairs up and down instead of the lift, walk up and down escalators instead of standing still, take the long route around your office building.
  • Park your car further away from your destination and walk the last bit.
  • Get up half an hour earlier and go for a walk before work.
  • Use a fitness tracker with a step counter, or a step counter app on your phone to track your daily steps. Pick a target number, start with 10,000 steps per day, and work towards getting your steps in each day.  Increase your target as you walk more.
  • parkrun! Walkers are very welcome at all parkruns all around the UK and the world. Register on the parkrun website, print off your barcode and turn up to your local event. They are FREE  timed 5km (3.1 mile) events and they happen every Saturday at 9am. If you’re even the tiniest bit competitive, the fact that you receive a time for each event should encourage you to turn up regularly and beat your personal best time and perhaps your friend's too. parkrun can be addictive and it might even encourage you to run a little…

The Long Distance Walker:

If you walk regularly how about walking further?

Physio Remedies’ team member Nik (AKA NoviceRunnerNik) is off to Northumberland to walk all 97 miles of St Oswald’s Way next month over six days.

Here are her 10 top tips for A Good Long Distance Walk:

  1. If you’re goal driven, sign up for a long distance event to train for – the Long Distance Walkers Association (LDWA) runs many walking events around the UK and holds details of other events too.
  2. Wear well-fitting shoes/boots and decent walking socks – get your walking boots fitted by trained fitters – I highly recommend Cotswold Outdoor (I always buy my boots and waterproofs here. I promise I’m not on commission!).
  3. Use walking poles to ease pressure on knees, especially on downhill paths
  4. Good kit to have: comfortable rucksack, good waterproof jacket, hat, sunglasses, hydration bladder (easier to drink from than a water bottle, less chance of becoming dehydrated), small first aid kit including Compeed for any blisters, sun block, spare walking socks.
  5. Train sensibly – start on short walks and build up your distance gradually.
  6. Be prepared for your walks – plan your route, take a paper map in case of phone/GPS failure. Check the weather forecast and pack accordingly. Take snacks, water, lunch, icecream money and warm clothing in case the weather changes. Always tell someone where you’re going and when you expect to be back.
  7. Stay hydrated and fuelled throughout your walk. You’ll enjoy it so much more if you’re feeling on top form.
  8. Rest every hour or so and at the tops of inclines for a few minutes to 'admire the view'.
  9. If you feel any pressure hotspots on your feet, investigate and apply a Compeed patch, before it turns into a blister.
  10. Enjoy being in the great outdoors!


As with everything, prevention is better than cure. Issues with feet can affect knees and backs too. If you have any concerns about your walking, our Foot & Ankle specialists can check you out and offer advice on footwear and foot support. Call us on 02030 12 12 22 to make an appointment.


Words and image by Nik Bathe (AKA NoviceRunnerNik).


NoviceRunnerNik: Supporting Your London Marathon Runner

London-Marathon-2017-big-ben.jpg
 

NoviceRunnerNik:  Supporting Your London Marathon Runner

You might not be a marathon runner yourself, you might not even be a runner but in a moment of madness you might have offered to cheer on your favourite marathon runner in the marathon to end all marathons, the Virgin Money London Marathon.

Of course, other marathons do exist and the following blog post is also applicable to pretty much all marathons.

Years ago, possibly even before she took up running, our NoviceRunnerNik promised her husband that in the unlikely event he was ever successful in gaining a place in the London Marathon ballot, she’d be on the course to support him on his way around. Last year, after five years of rejections, he finally got a place, the same year in which his sister also got a place via the ballot on her first attempt!

So here are NoviceRunnerNik’s top 10 tips for supporting your London Marathon runner:

1.       Choose your runner carefully. If you fancy a fun stroll around London, stopping for a couple of pints, a wander in the park, a tasty lunch, whilst popping up on the course now and then to wave at your hero  then make sure your runner’s target finish time is around 6 – 7 hours. Don’t make my mistake of thinking I could do all of that whilst supporting a runner targeting 3 hours 30 mins. You just won’t have time to do much except rush about on public transport and cheer a lot.

2.       Plan your cheering carefully in advance and tell your runner where they should expect to see you so that they can look out for you. There are lots of online guides available which will tell you distances and times for various finishing target times. Don’t be over ambitious on number of cheering spots. Public transport, road closures and the sheer number of people out and about mean that getting around is slow. I only had a vague plan so my husband missed me on all three occasions he ran past me (although other runners from our running club did spot me and my signs so I wonder if my husband can actually recognise me in a crowd!).

 
Fancy dress hats for spectating might well be a good idea - easy for your runner to spot you!

Fancy dress hats for spectating might well be a good idea - easy for your runner to spot you!


3.       Make a sign or two to hold up to cheer everyone on. You could go with encouraging signs such ‘Run Well Mr B’ or ‘You can do it!’ but I’d also have at least one sarcastic one to hand ‘Smile – you paid to do this!’ for deployment in the last few painful miles.

4.       Make meet up arrangements beforehand. The sheer number of people in the finish area means that mobile phone signal is patchy to non-existent at times, particularly after the 4 hour finishers come in. The finish area has letters of the alphabet on poles – arrange to meet your runner by a certain letter – avoid the most popular surname letters to avoid the big crowds.

5.       If you’re a runner, go to the London Marathon Expo. Your runner will have to register at the Expo on the Friday or the Saturday before the marathon, unless they’ve got a friend who’ll do it for them. The Expo is worth a look around with some great talks, interesting demos, more running kit than you could possibly ever want and lots of freebies and samples. If you have any sense you’ll leave your credit card at home, or you’ll arrive back with A Little Miss Chatterbox running vest, a Love Hearts running vest and some beetroot energy bars. None of which you actually need. True story.

6.       Don’t attempt to go to the start line with your runner. The course starts well away from the finish line and most runners seem to need to depart their accommodation at the crack of dawn to join the massive loo queues early. Have a lie in and then get to around Mile 5 or just after, before the Elite runners come through as it’s really exciting to watch them and then the whole crowd surge through.

7.       Be prepared. Take waterproofs / SPF 30 depending on the weather forecast, snacks, drinks, a good sense of humour and wear running shoes (a top tip from our very own Paul Martin who advises that people will chat to you if you look like you might be a runner!) or other comfortable shoes.

8.       If you see a useable loo, use it. You don’t know when you’ll next come across one!

9.       Enjoy a fab day out. Enjoy the cheering, the banter, the fancy dress spotting.  My personal favourite last year was a man running barefoot, dressed as Jesus, carrying a 2 metre high cross! Do stop for that pint but do keep an eye on the clock. I was still sinking my one and only pint of the day (overpriced and in a plastic glass) near Mile 24 when I realised that my husband had probably just finished. He had – just ahead of his target time - in 3 hours 27 mins 27 seconds! I still beat him to our meet up point as he spent quite a bit of time having his blisters attended to by the medics.

10.   Be patient, getting home is slow. Don’t forget that your marathon runner has just run 26.2 miles, not to mention all of that walking to the start and from the finish. They will be slow. But they will be wearing a very large London Marathon medal - I don’t know why they make them so heavy, seems a bit unfair! -  and a beaming smile! People will offer them seats on the Underground. Strangers will ask you what your runner’s finishing time was and you’ll proudly tell them down to the second.  Enjoy the reflected glory!


He did it!

He did it!


Words and images by NoviceRunnerNik.

Fraser Cartmell: Kit for getting started in triathlon

This month, our pro triathlete, Fraser Cartmell, writes about the basic kit that you need to get started in triathlon and his favourite bits of kit for each discipline.

Looking in from the 'outside', triathlon by its very nature can be viewed as a complicated sport, given the combination of three separate sports (or disciplines) within a sport! Indeed, when I began racing triathlon as a young junior in the north east of Scotland, nearly twenty years ago it appeared a daunting task to begin with, but as with most things in life, baby steps (and plenty of borrowed items) got me started on the journey. It's safe to say I've been hooked ever since.

The sport is littered with different bits and pieces of equipment that you can appear to *need* in order to toe the start line - triathlon is undoubtedly a marketing dream! However, stripped back to the bare essentials it can hopefully resemble a far more attainable event for the everyday person who might want to give it a go, just to see how they find it. The *need* for the shiny and sparkling equipment can come later!

Swim

To begin your triathlon journey the pool triathlon is a great starting point. As long as you have a trusty swimming costume and goggles, you're all set. Fancy, once piece triathlon suits, and expensive wetsuits for open swimming can come later if you decide you're keen. One thing I will advise against is using a regular surf wetsuit with the belief that "it'll work fine"... I used a friends' windsurf version for my very first open water event and it was a miracle I ever made it ashore! But you learn quickly, and these days my tri specific wetsuit, complete with far thinner and more flexible neoprene is certainly one of my key pieces of race equipment.

Bike

As a youngster who explored the countryside after school on his trusty mountain bike, I was familiar with riding off road, rather than on a road bike. And so, conveniently my first taste of racing a triathlon was an off road event, which I loved. Once the inevitable triathlon seed had been sown, we (my parents) were able to borrow a road bike from (another!) friend for the remainder of that summer until Christmas came around for my very own set of speedier wheels. My point here is that the *need* for expensive, aero tri-specific bicycles isn't necessarily justified until you've really sunk your teeth into a number of local level events, to test your appetite. Perhaps inevitably however, my time trial bike resplendent with electronic gears and carbon wheels has become a firm favourite piece of kit that I spend extra care looking after.

Run

I always believe that shoes and footwear are as exciting to me as they are everyone else, but I'm not so sure? Personally, I love the smell of a new pair of trainers when they appear from the shoebox, and so over the years of racing professionally I have become spoilt with the deliveries of new shoes that sponsors have kindly sent.  Whether it be for training or racing, I'm a total sucker for a fresh set of trainers and I think after my bike these rank as 'next best favourite' items on my list, and I'll do my best to keep them in good condition. I might even have been known to machine wash shoes (which you are not supposed to... it's bad for both the washing machine AND the shoes apparently!) to keep them clean. It works a treat!

Accessories

As technology has rapidly progressed there are now all sorts of other 'extra' things that we *need* to train and race for triathlon, including (but not limited to) GPS running watches and cycling computers, electrolyte energy drinks and carbohydrate specific bars, racing helmets with visors and bike shoes with ratchets and straps. There are even special pedals that measure your power output (that the aforementioned cycle computer will tell you about) and many more I have limited time to write about!

Too many items to choose your favourite from I'd say ;)


Words by Fraser Cartmell.

Helpful Hints for the Holidays

Back and neck pain are common problems experienced when travelling or staying away from home - so here are some ideas to help you enjoy a more comfortable summer break.

In the car:

  • Make sure you sit with good posture - if your car doesn’t have enough low back support use a rolled up towel (pick the right size!) or buy a purpose-designed lumbar roll.
  • Don’t allow your chin to poke forwards as you peer out the windscreen - especially at night! This is a very common habit and can result in a stiff and sore neck. The back of your head should be just touching the headrest support and your chin should be tucked towards your Adam’s apple.
  • Take breaks – get out and walk about every hour or so even if just for a few minutes.

On the plane:

  • Don’t fall asleep in an awkward position - try and keep your back in its normal alignment (again a small lumbar roll can help with this) and use a horse shoe shaped neck support to help stop your neck kinking into the wrong position.
  • Remember sustained positioning when your joints are not in neutral alignment can cause damage and pain – so avoid it.
  • If you're on a long flight, get up and walk every two hours. This will also help your circulation.

In bed:

  • Lots of people suffer as a result of sleeping in a strange bed. Whilst there’s not a lot you can do about the bed itself you can alter the pillows (or take your own).
  • The pillow’s purpose is to fill the space between the head and neck and the mattress.  If you sleep on your back your pillow should be fairly flat.  If you’re on your side that pillow should fill the space between your shoulder and head to ensure your neck is held straight and doesn’t drop down toward the mattress (too flat pillows)  or is pushed away (too many pillows) - it should be ‘just right’.

And remember we are open throughout the summer holidays to help ease any aches and pains. Just call us on 02030 12 12 22 or send an email to info@physioremedies.com to make an appointment.

Words by Kara Mulvein.