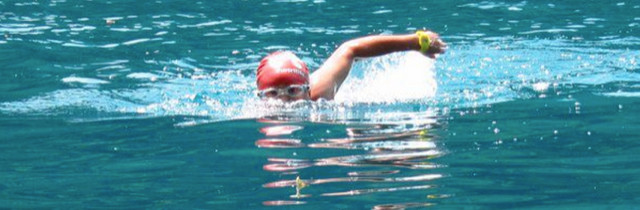
Open Water Swimming Tips
Now the triathlon and Open Water Season is in full swing, if you’re feeling slightly anxious, here are a few tips from our soft tissue therapist and Triathlon coach, Emily Chong, to help your training and competing:
Practice, practice, practice!
Find some open water to train in before your event and get used to lower visibility and the natural environment.
Practice in your wetsuit. Wear your goggles under the swim cap, or better yet wear two caps and have the goggles sandwiched in between (less chance of them getting knocked off).
Starting in a race
If it is a deep water start, get yourself horizontal, gently kick your legs and scull with your arms out stretched. When the horn goes, you’re in the right position to take a few strong kicks and pull forward.
If you prefer not to be in the crowd, go to the side and swim wide of the turning buoys.
Swimming in a wetsuit
When swimming in a wetsuit, relax your elbows so you’re not fighting the neoprene, straight arm recovery is absolutely suitable for open water.
Focus on engaging your gluteus muscles (clench your bottom!) keeping your legs together and make sure your core is long and engaged. Imagine doing a plank and you should feel your legs rubbing at thigh, calves and toes just touching.
Use body rotation to lengthen your stroke, entering your hands in 10 o’clock and 2’ o’clock position. This helps engage your back muscles to swim. Imagine doing a pull up - it’s almost impossible with our hands together, but with your hands slightly wider than shoulders, you will have much more power to pull yourself up.
When you get into the water, splash your face and the back of your neck. Put your face in and slowly exhale. If you have a tendency to panic, take some time to do this until you feel your heart rate has calmed down.
Sighting
While waiting to start, look at the course and find something in the landscape that lines up with the buoy markers to sight for. Something like a hill or a tall colourful building so it would only take one glimpse to see (buoys may seem big, but once you are horizontal amongst splashing swimmers, they can be hard to spot).
Think crocodile eyes, try not to lift your head too much or your legs will sink, making swimming harder. Find a pattern to suit your breathing / sighting.
Plan B
If you feel your chest is too tight / your goggles get knocked off / you are cramping, roll on to your back, take some deep breaths, readjust yourself, once you feel ready, roll back to your front and carry on. If necessary, hold one arm in the air, the safety kayak will come to your rescue.
Finishing
As you approach the pontoon, speed up your kick a little to activate your legs and to get blood flowing. Take it easy going from swimming position to standing up position, you may feel a little dizzy due to blood going from the top half of your body down to your legs.
Undo neck velcro on your wetsuit and pull the cord to open the zip. Grab the neck opening and pull your arm out of the wetsuit. If your wetsuit gets stuck at your wrist, loop it around your knee and use it to pull it out. If you already have your cap and goggles in your hands, great! they can stay inside the wetsuit sleeve till after the race.
Pull down wetsuit from the waist, side step and stand on your wetsuit several times to get your feet out.
Done! now go and enjoy your ride and run (or post race celebration).
How to put on a wetsuit
Use a glide stick or other thick lubrication (Rock Rub is my favourite) and generously rub it over your forearms, calves, quads and hamstrings and around your neck.
Put some cotton gloves on to avoid nicking your wetsuit with fingernails. If possible always grab the inside material to pull rather than the smooth outer side of the neoprene)
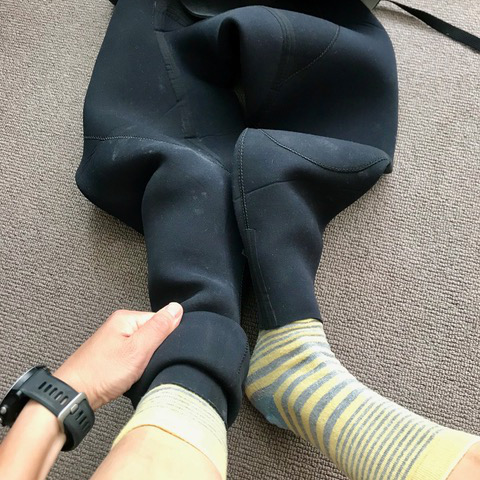
Turn the bottom half of your wetsuit inside out.
Keep your socks on (or put each foot into a plastic bag), and put your feet into the leg holes and roll up the legs. (Remember the zip should be at the back!)
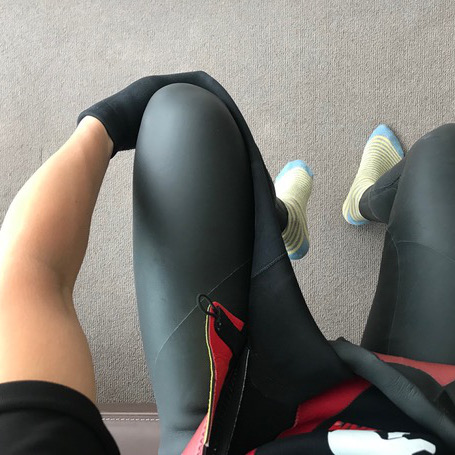
Pull the wetsuit up to your waist.
Ideally, find someone who can grab the wetsuit from behind and pull it up as though they were going to give you a “wedgy”. Otherwise, do that yourself, keep pulling up until the crotch area is more than snug.
Put one arm in, pull it up to your shoulder, then put the other arm in.
Ideally, get someone to “shoehorn” you in from behind. They should put their hands on the back of your shoulder / upper arm and pull the wetsuit back to create more space in the chest.
If there is nobody to help you, bend the elbow, grab the crease and ease more material towards your shoulder until the zip is fairly close together at the back.
Once both arms are shoehorned in, the back zip should be quite close together without having to pinch your shoulder blades together (if not, you will probably struggle to breathe). Now you can zip it up.
If it feels like it’s restricting your neck, bend forward, grab the crease and ease more material towards your chest.
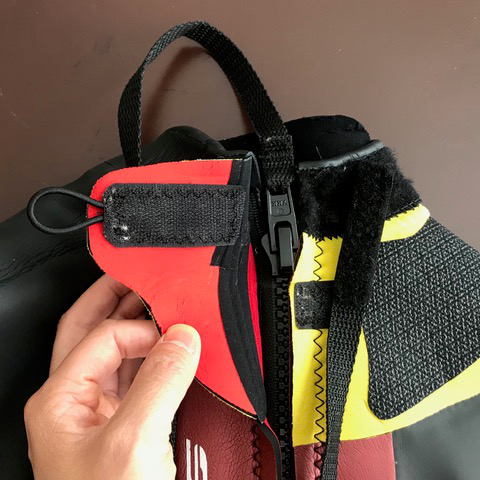
Make sure the zip is in “up” position, loop the cord over the neck velcro and stick the end of the cord in it, so you know where to find it when you need to take it off. (Remember to take your socks off!)
Call us on 02030 12 12 22 to book an appointment if you have any injuries or niggles or if you'd like a pre- or post-race sports massage.
Words and images by Emily Chong.